

Using Loops & Logic In Geometry Nodes
Iterate Over Data With The Repeat Zone, Simulation Zone, & For Each Element Zone in Geometry Nodes for Blender 4.3


Non-destructive modelling can be a fairly linear process within Geometry Nodes. It might seem like a challenge just stringing together nodes to get where you want, but there is a lot of powerful components that we haven't covered. While Fields can certainly take a while to get used to, our next Geometry Nodes component will exponentially increase your abilities.
Loops are a core part of programming logic. Being able to repeatedly call functions and execute commands save programmers the task of tediously rewriting code snippets. Since procedural modelling is just applying logic to 3D geometry, it stands to reason that we should be able to do the same.
In this tutorial, we'll be looking at the Repeat Zone, the Simulation Zone, and the For Each Element Zone. Each takes in geometry data and allows us to work through different means to establish a set of actions to repeat.
Repeat Zone
Starting off with the simplest of the three zones currently available in Blender 4.3, the Repeat Zone does exactly like it says. After you connect some geometry data and specify the amount of iterations, you can string together nodes within the zone that will repeat as many times as the amount of iterations you set.

Normally I'd continue to talk about the specifics of what the zone does and what you can and can't do, however we're beginning to go beyond the topics that need in-depth explanations. Instead, it's better to show the node's behaviour.
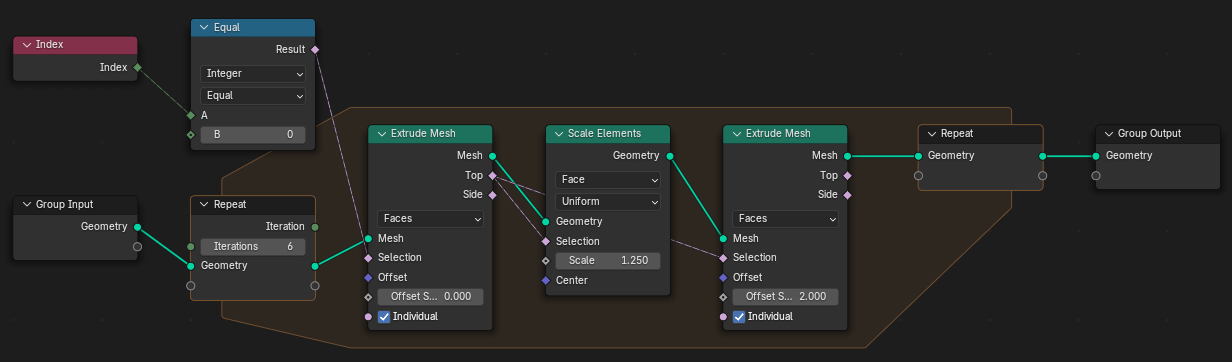
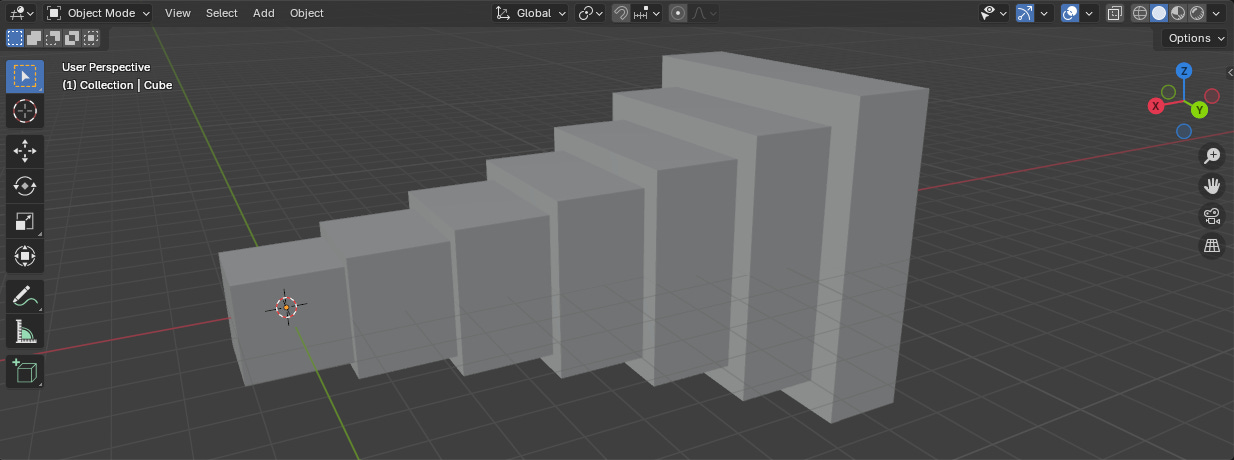
In the above picture, we are taking the starting default cube and passing it into the starting Repeat Zone node on the left side. Then, it enters the Repeat Zone (as indicated by the orange zone) and passes through an Extrude Mesh node, a Scale Elements node, and another Extrude Mesh node before going into the ending Repeat Zone node on the right side. The Repeat Zone is set for 6 iterations, meaning that those three nodes will repeat their actions 6 times. The Repeat Zone then outputs the results of those 6 iterations (the 6 applications of the nodes within the Repeat Zone) which goes to the group output. The result of this node group looks like this:
One important aspect of the Repeat Zone (and for the Zones we'll talk about in just a minute) is that any data that is passed into the starting Repeat Zone on the left and used in the nodes within the Zone, needs to be passed back out if you want to use it in consecutive iterations. Otherwise the data will be used on the first iteration and then disappear since you haven't directed that data to be used in future iterations. What flows in from the left must go out through the right to be continuously used.

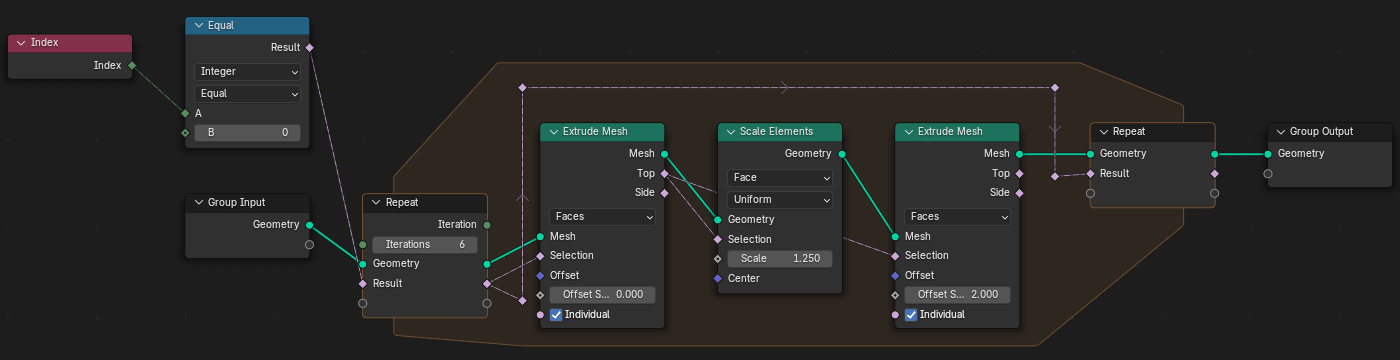
Alternatively, you can just input the data point directly into the node from outside the Repeat Zone and it will have the same effect as outputting the data on the ending Repeat Zone node on the right side.
Simulation Zone
The Simulation Zone might appear to be the same as the Repeat Zone, but it serves a whole other purpose. While the Repeat Zone will just output the results of its iterations all at once, a Simulation Zone will only output its results on every frame.

As you can guess, the Simulation Zone is best suited for work that involves calculations based on previous frames. If you are looking to create a solver for any type of physically-based simulation in Geometry Nodes, the Simulation Zone is going to be your friend.
Caching & Baking
As the nature of the Simulation Zone is frame to frame, having to recalculate the Simulation every time can be quite taxing on your computer. That's why Blender automatically takes a Cache of the Simulation Zone when you playback your scene. However, if you only need one frame of data and don't want to review the individual frames of a simulation, you can disable the automatic caching in the side menu of the Geometry Nodes Editor.
Finally, if you finish adjusting the components of a Simulation Zone, you can choose to Bake the simulation to disk, creating a physical file that will play back the simulation exactly as was when you calculated it. This is helpful when rendering a scene, as the behaviour of the simulation is exactly how you saved it. Be aware though that if you go back and make changes, you'll have to re-bake your simulation to get the updated simulation.
For Each Element Zone
Finally, the For Each Element Zone is the most complex loop in the group. Much like a For Each loop in programming, the For Each Element Zone operates by applying the nodes contained within to every selected element on an inputted geometry. The starting node on the left will have a drop-down menu that lets you select the domain of the elements that you want to operate on. The ending node on the right lets you see the generated geometry separate from the geometry you inputted.

While the Repeat Zone iterates a set amount of actions uniformly over a geometry, the For Each Element Zone grants you a finer degree of control. By utilizing each individual element on a geometry, you have the ability to create very complex calculations, selections, and operations.
The trade-off of this is that the For Each Element Zone is very computationally heavy. It's best to avoid using whenever possible, however there's a good chance that if you find yourself utilizing the aspects of it, you wouldn't be able to use any other method anyway. Just be prepared for an increase in evaluation time if a For Each Element Zone is doing a lot of work.
Workflow
The possible use cases of each Zone is quite extensive, so it's not worth trying to outline a whole method to do something specific. Instead, I'll link to two videos explaining how to use Simulation Zones and For Each Element Zones. They’re both made by the official Blender teams and give much better examples and explanations than I could hope to achieve in one newsletter.
If you’d like to see a practical application of the Repeat Zone in action, then I do have you covered! I made extensive use of a Repeat Zone in our paid article on Making Custom Shapes and Structures. If you haven’t checked that out already then you should be able to use a free preview post, or feel free to start a paid subscription and help out the publication.

Simulation Zone
For Each Element Zone
Outro
In this article we went over a brief introduction to the 3 types of Zones within Geometry Nodes as of Blender 4.3, including the Repeat Zone, the Simulation Zone, and the For Each Element Zone.
Next Week
We’ll be doing a recap and summary of the past month’s articles, along with some more clarification on points that might have gotten muddled along the way. If you have any questions you’d like clarified, please let me know in the comments below!
Supporter Content
We released our first paid article on Monday based on creating custom shapes and objects within Geometry Nodes. Free subscribers are able to use a free preview to view the article, but those are limited.
The next paid article will be coming on Monday, February 3rd, and will be focusing on creating terrain and procedural landscape customization within Geometry Nodes. I am super excited for that article since it builds upon the concepts we’ve talked about before, with a particular emphasis on some of the Zones we covered today! Stay tuned for that!
If you enjoyed this tutorial, please like and sign up for a free subscription to MipMap! Or, if you didn’t enjoy then leave a comment to let me know what I can do better for the future. Either way, thank you for reading MipMap!
- Adam