Learn How To Navigate Unreal Engine 5
Interface Components, Terminology, & The Differences Between UE5 & Other DCCs.
Unreal Engine 5 was a technical milestone when Epic Games unveiled it back in 2020. Now with version 5.5 five years later, the company still hasn't let up in pushing real-time graphics forwards. Whether it's Nanite, Lumen, PCOs, Substrate materials, or any other of the dozens of features released over the past couple of years, Unreal Engine has become a solid choice for both artists and developers alike.
If you happen to fall into the former group, and maybe even the later, then you have come to the right newsletter. Over the next couple of months, I am going to be diving head-first into Unreal Engine 5 and all it has to offer. This first issue will be covering the basics of maneuvering about the tool and what you can expect coming from other Digital Content Creator tools. While I won't be able to fully make use of all of the technical aspects of the engine, I will be doing my best to digest what UE5 has to offer and turning it into palatable, readable information. So if you'd like to learn about all that Unreal Engine 5 has to offer, then be sure to subscribe and stay tuned for all that has yet to come!
Unreal Engine 5 Versus Other DCCs
If you’ve heard of Unreal Engine 5 before, then you know that first and foremost it is primarily a video game engine. Unlike Blender or Maya that are focused on pre-rendered products, UE5 is built around real-time applications (however UE5 does have pre-rendering capabilities). Don't be fooled into thinking it's just for video games though, since UE5 is being used in so many different industries that it's becoming difficult to only see it as a game engine. For our purposes though, we'll be looking at UE5 through the lens of artists and creatives wanting to utilize the tool for their own workflows.
Rather than diving straight into features and tricks, it's worth starting with how Unreal Engine 5 differs from traditional DCCs. Even though it utilizes the same principles and is even built using some of the same technologies, we can't just apply a Blender or Maya-based mindset to UE5. Here are some key areas to keep in mind when beginning to work inside UE5:
Projects Are Structured Differently
When you boot up the editor for the first time, you'll come across a screen that looks innocent enough. Epic is kind enough to provide us with a wide selection of templates to start from, however you might be deceived into thinking that the starting point for Unreal is the same as a blank scene in Blender. The reality is that an Unreal Engine 5 project is more akin to the folder that you put your Blender scenes into, rather than the scene itself.
Since UE5 has its origin in games, what we know as Blender scenes or Maya files are really more akin to UE5’s Levels or even individual UAssets. We'll dive into the specifics of UAssets more next week, but for now just know that UAssets are the individual components of every Level. Even the Level itself is a UAsset, but we don't have to worry about that now. The actionable part of this section is to treat an Unreal Project as a container that all of your components will fit inside, not an individual scene that can be easily duplicated.
The Editor Is The Engine Itself
Another big difference is the fact that when you are inside the Unreal Editor, you are running Unreal Engine 5 in almost the same way you would if you were playing a game made with Unreal Engine 5. Again, this is in stark contrast with Blender, whose output is normally in rendered frames rather than real-time experiences.
What this actually means is that the changes you make to your assets will be updated in real-time (after you re-compile them, more on this later). Be wary of experimenting with outrageous values or assets, because unless you have a beefy computer you will certainly feel the pain.
Miscellaneous Differences
These are a handful of tips that weren’t big enough to get their own section, so I’ll throw them all together in a list here.
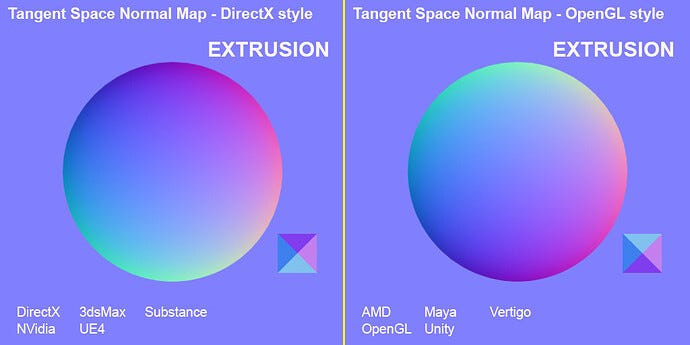
UE5 uses DirectX-styled shaders, as opposed to OpenGL-styled shaders like Blender. (The Green channel in Normal textures are reversed.)
Unreal Engine is Z-Up, with a Left-Handed model.
Everything lives in the Content Drawer (more on this later), and if it isn’t there it isn’t in the project.
Editor Terminology
When we decide to use Unreal Engine, we have many systems and tools to choose from. For the most part, Epic has done a fantastic job of keeping most of Unreal Engine’s functionality and tool-kits categorized into three sections:
Tools
"Something you use to perform a specific task, like placing Actors inside a level, or painting terrain."
Editors
"A collection of tools you use to achieve something more complex. For example, the Level Editor enables you to build your game's levels, or you can change the look and feel of Materials inside the Materials Editor."
Systems
"A large collection of features that work together to produce some aspect of the game or application. For example, Blueprint is a system to visually script gameplay elements."
Easy categorization isn’t always the most optimal though. This means that there are a lot of entries in each of the above categories. In fairness though, you'll probably only actually need to interact with a handful of each at any given time, and you likely won't need to move back and forth between anymore than two of each type at a time. You can also add in additional entries into any of these categories by installing Plugins, however that is beyond the scope of this article.
In addition to the core sections, here are some related terms that you might come across, and a link to Epic’s own documentation to get a full list:
Actor
An Actor is any object that can be placed into a level, such as a Camera, static mesh, or player start location. Actors support 3D transformations such as translation, rotation, and scaling.
Blueprint
The Blueprint Visual Scripting system is a complete gameplay scripting system that uses a node-based interface to create gameplay elements from within Unreal Editor.
Class
A Class defines the behaviors and properties of a particular Actor or Object in Unreal Engine. Classes are hierarchical, meaning a Class inherits information from its parent Class (that is, the Class it was derived or "sub-classed" from) and passes that information to its children.
Component
A Component is a piece of functionality that can be added to an Actor. When you add a Component to an Actor, the Actor can use the functionality that the Component provides. Components must be attached to an Actor and can't exist by themselves.
Level
A Level is a gameplay area that you define. Levels contain everything a player can see and interact with, such as geometry, Pawns, and Actors. Unreal Engine saves each level as a separate “
.umap”file, which is why you will sometimes see them referred to as Maps.
World
A World is a container for all the Levels that make up your game. It handles the streaming of Levels and the spawning (creation) of dynamic Actors.
Editor Interface
Now we can get into the real meat and bones.
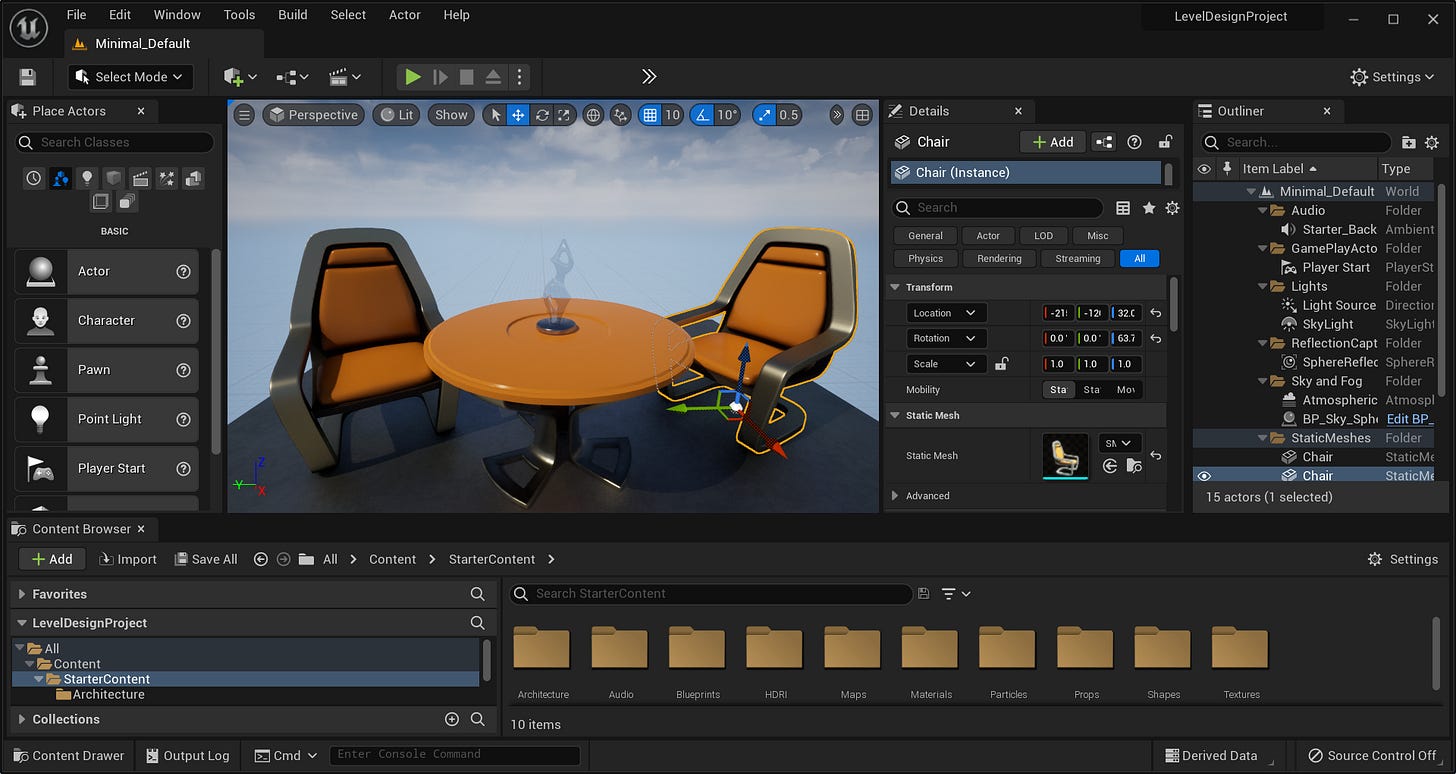
After you've chosen a project template (or blank scene) and the project has compiled, you'll be greeted by a very plane looking viewport, and a collection of menus that can be overwhelming when you don't know what you're looking at. Something like this, I would bet:
Fortunately, the folks at Epic have some great documentation, and have even thought about helping out newcomers with figuring out what everything is. The starting window can be broken done into something like this:
By default, the Unreal Editor places us inside the Level Editor, but the components of every editor remain fairly consistent throughout all editors. Across the editor we'll almost always have the following components:
Menu Bar
Dropdown menus providing access to a number of tools, commands, and functions.
Main Toolbar
Editor specific section containing shortcuts for commonly used tools and actions.
Viewport/Graph
The biggest section of your screen, this is where you will be interacting with the individual items, nodes, and logic for your projects. In the Level Editor, this is a 3D viewport into the Level, but for something like the Material Editor it's a 2D graph with nodes.
Content Drawer
The Content Drawer is where all of your project assets live. By default it is a pop-up window, however you can anchor it into your interface by setting the option under the gear icon.
Bottom Toolbar
This is the location of the Unreal Command Line, Output Logs, and other more technical options. This is where you'll connect with Source Control services, along with the Derived Dedicated Cache for quickly accessing and storing items (more on this in a future article).
Outliner
The Outliner will be familiar to you if you've worked in another DCC, and it functions similarly in UE5. It isn't in every editor, but some form of it will be if you're dealing with multiple different actors or objects.
Details Panel
Again, this section is similar to other DCCs, and displays information about the selected object. In some editors you might have multiple panels that are each dedicated to a different section of information.
Outro
For our debut Unreal Engine exploration tutorial, we went over some basic foundations to get familiar with how the Unreal Engine operates. We highlighted some of the key differences between it and other DCC tools, basic terminology you might encounter, and went over the basics of the editor’s interface.
Next week we’ll be going over the ubiquitous UAsset object, and how individual files all come together inside of Unreal Engine 5. Supporters will receive an article on March 17th detailing how to work with USD files across almost all DCCs, so make sure to stay tuned for that.
Otherwise, thanks for reading! We’ll see you next time for another article.
- Adam


